
Deep Learning (Machine Learning) applied to Tinder

Hey guys! Today we’re going to see how to apply Deep Learning to Tinder in order to make your own bot able to swipe either left/right automatically. More specifically, we’re going to use Convolutional Neural Networks. Never heard of them? Those models are great: they recognize objects, places and people in your personal photos, signs, people and lights in self-driving cars, crops, forests and traffic in aerial imagery, various anomalies in medical images and all kinds of other useful things. But once in a while these powerful visual recognition models can also be warped for distraction, fun and amusement. In this experiment, we’re going to do that:
- We’ll take a a powerful, 5-million-parameter almost state-of-the-art Convolutional Neural Network, feed it thousands of images scraped from the internet, and train it to classify between attractive pictures from less attractive ones.
- The dataset is composed of 151k images, scraped from Instagram and Tinder (50% from Instagram, 50% from Tinder). Because we don’t have access to the full Tinder database to calculate the attractiveness ratio (how many right swipes over the total number of views), we augmented the dataset with pictures from Instagram for which we know the attractiveness is high (clue: Kim Kardashian instagram).
Let’s get started!
Data
We have approximately 151k images taken from Instagram and Tinder. Our problem is a classification task. We want to classify between highly attractive (LIKE) to less attractive (NOPE). We proceed as follows: all pictures from Instagram are tagged LIKE and pictures from Tinder are tagged NOPE. We will see later on how this split can be useful for our auto swiper. Let’s dive first in the data and see how it looks like:
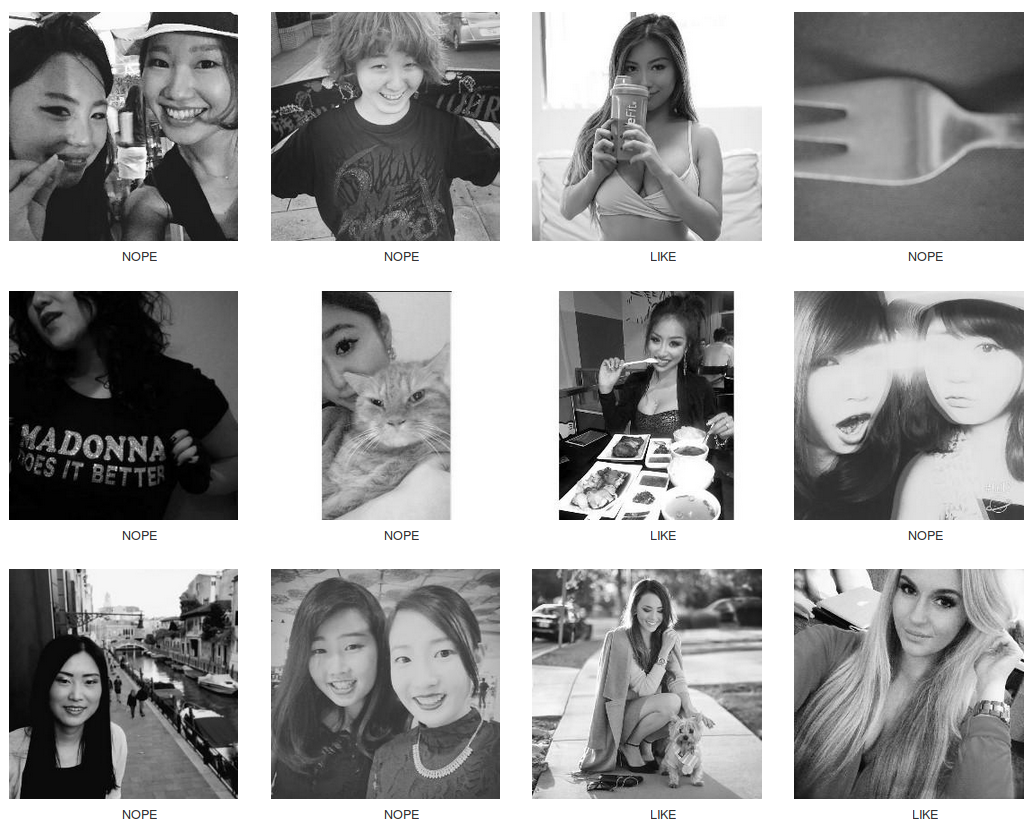
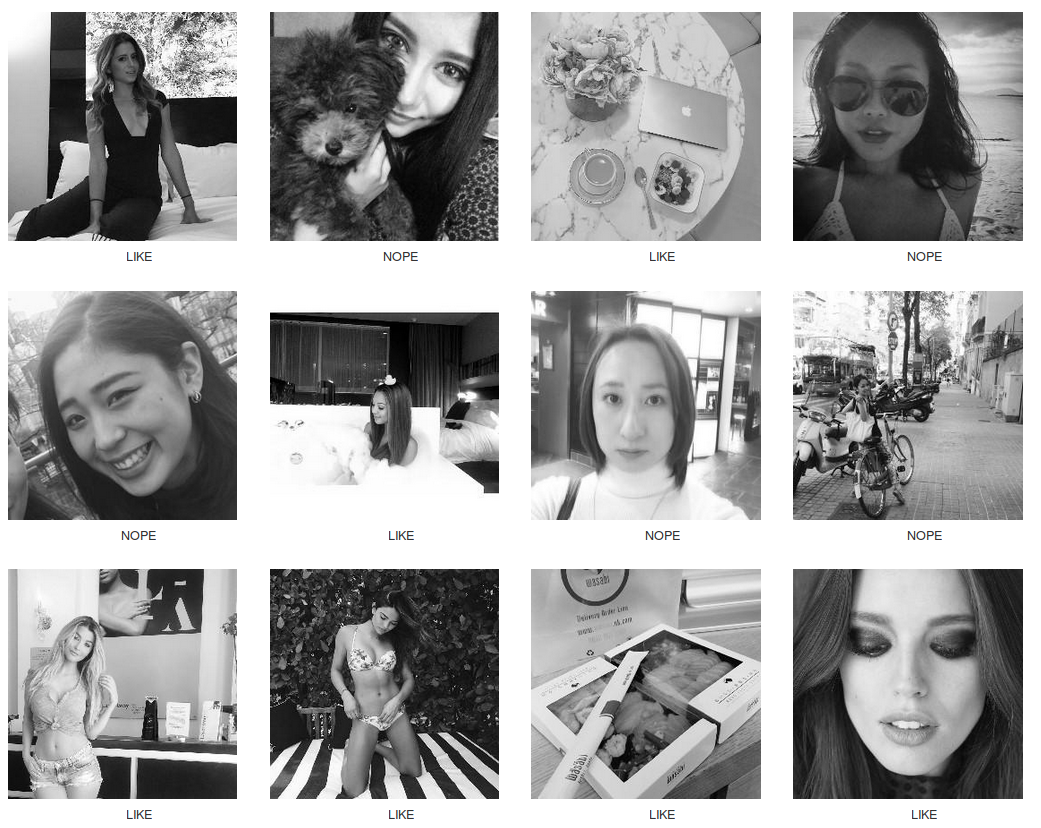

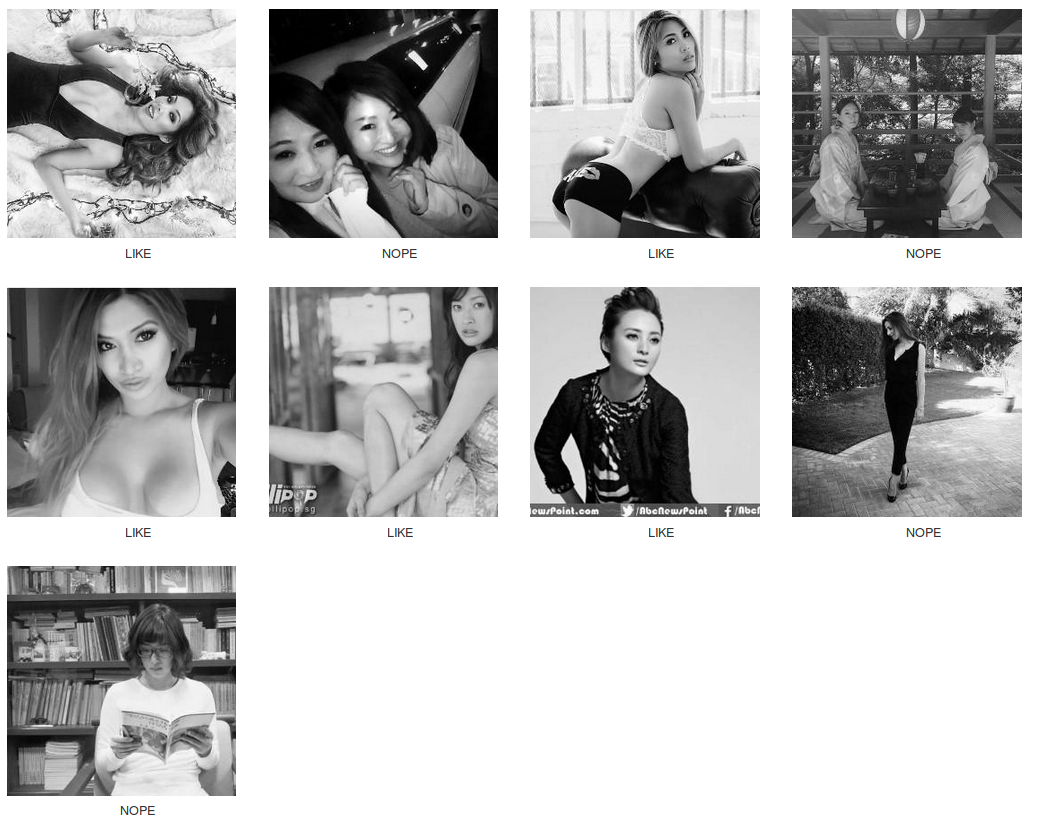
Not too bad right? We want to create a model that can predict the label (LIKE or NOPE) associated to each image. For this, we use what we call an image classification model and more precisely a Convolutional Neural Network here.
Deep Learning Model part
Here is how the output of our image classification model looks like:
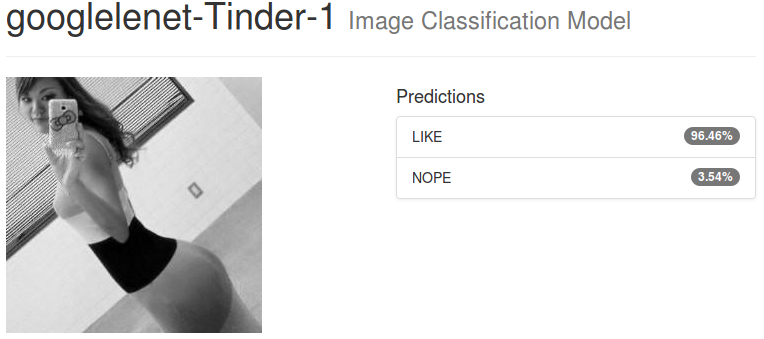
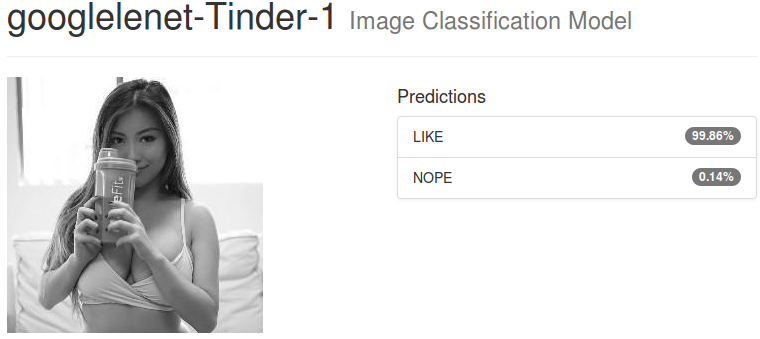
Okay I don’t get it. Let’s say we have a perfect model with 100% accuracy. We feed some random pictures of Tinder. It’s going to be classified as NOPE all the time according to how the dataset is defined?
The answer is a partial yes. It translates in the fact that not only the model can predict the class (LIKE or NOPE) but also it can give a confidence percentage. For the second picture, the LIKE conviction reaches 99.84% while it tops at 96.46% for the first picture. We can make the conclusion that the model is less sure (to some extent) for the first picture. Empirically, the model will always output values with a very high confidence (either close to 100 or close to 0). It can lead to a wrong analysis if not taken seriously. The trick here is to specify a low threshold, say 40% slightly lower than the default 50%, for which all photos above this limit will be categorized as LIKE. This also increases the number of times the model will output a LIKE value from a Tinder picture (If we don’t do that, we only rely on True Negatives for our predictions).
Auto Swiper
Now that we have an image classification model that takes as input an image and spits out a confidence number (0 means not attractive at all, 100 for super attractive), let’s attack the Auto Swiper part.
A profile usually consists in a combination of more than one picture. We consider that if at least one picture has the status LIKE, we swipe right. If all the pictures are marked as NOPE by the classification model, we swipe left. We don’t make any analysis based on the descriptions and/or age. The whole bot can swipe several times per second, more than any human could do.
Below is an execution of a single run:
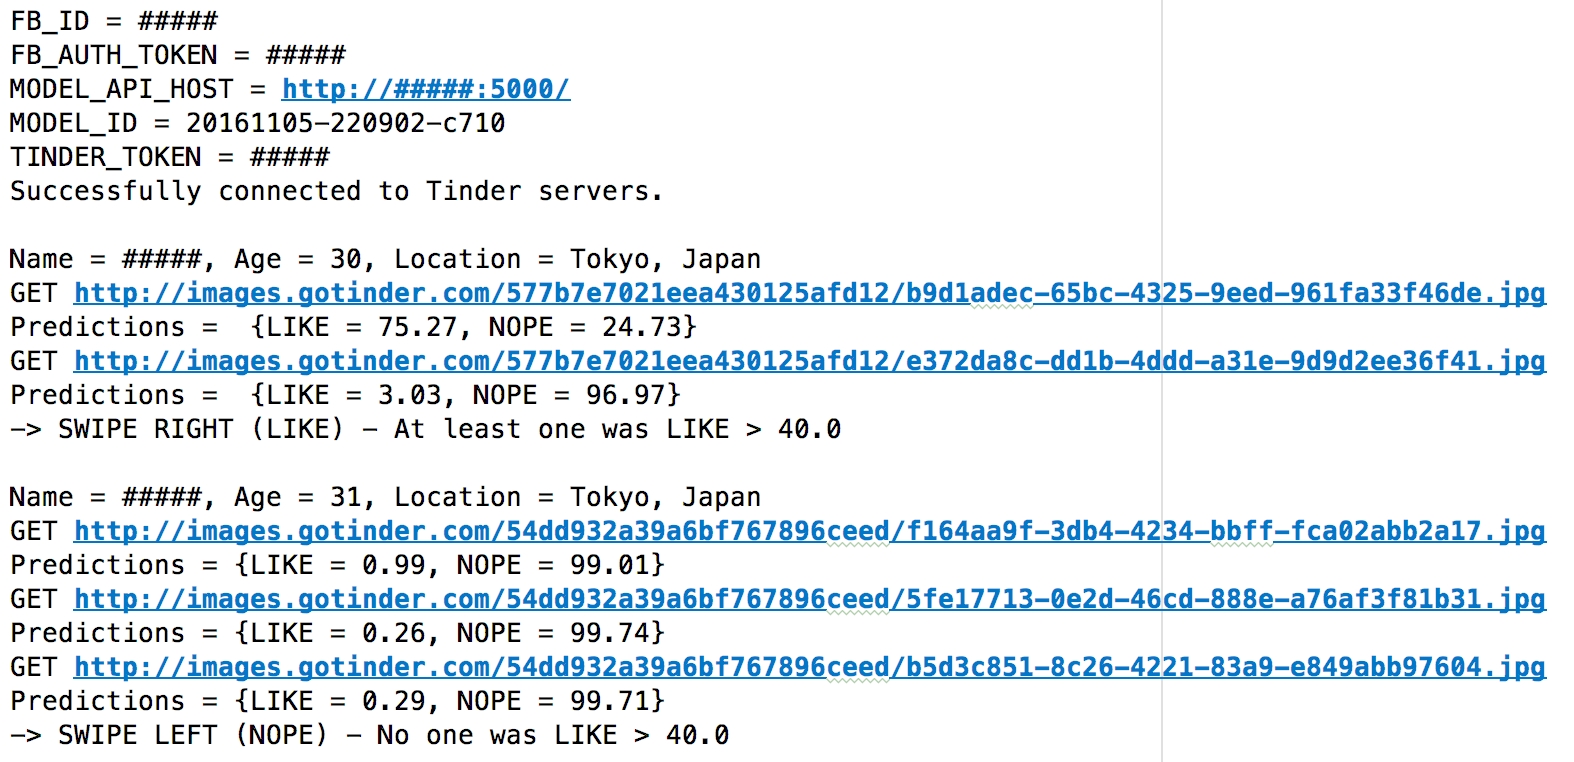
With the images, we get:
 </img> </img> |
 </img> </img> |
|---|
-> SWIPE RIGHT (LIKE) - At least one was LIKE > 40.0. Predictions were [75.27, 3.03].
 </img> </img> |
 </img> </img> |
 </img> </img> |
|---|
-> SWIPE LEFT (NOPE) - No one was LIKE > 40.0. Predictions were [0.99, 0.26, 0.29].
Feel free to skip the next section, more technical, and jump directly to the conclusion.
Behind the scenes (a tiny bit more technical)
Dataset
We use the following parameters to build our dataset:
- Image Size: 256x256
- Image Type: GRAYSCALE
- Training set: 128422 images (85%)
- Validation set: 22659 images (15%)
- Total: 151081 images (100%)
The training set corresponds to the pictures the model will train on. The validation set consists of unseen pictures and is used to benchmark how good our model is. A usual good pattern is to increase the accuracy on both the training and the validation set at the same time. If the training accuracy goes up and the validation accuracy dramatically goes down, it means our model overfits and shows difficulties to generalize on unseen data. If the training accuracy is too slow, the model cannot learn. Two possibilities arise. Either it’s impossible to distinguish between LIKE and NOPE (could be a possibility); or the model is too simple to understand this difficult classification.
Hardware
Hardware-wise, we use the following setup for our experiment:
- Core i5 6500 (6M cache, up to 3.60Ghz, 4 cores)
- GTX 1070 with 8GB of memory
- 32GB of memory
Software
Software-wise, we use the combination of Caffe and DIGITS for the deep learning part. The Auto Swiper is written in Python.
DIGITS is a webapp for training deep learning models. It uses the framework Caffe as a backend to train Convolutional Neural Networks (Conv Nets).

If you want to set it up yourself, I strongly advise you to:
- Pick up a graphic card with at least 6GB of memory (our experiment requires around 4GB)
- Use a fresh install of Ubuntu 14.04, 16.04
- Build DIGITS and all your frameworks from the sources BuildDigits
To install the NVIDIA Driver, CUDA and CuDNN, go on https://developer.nvidia.com/cuda-downloads and download the latest compatible drivers for your graphic card. Use the following settings:
- Operating System: Linux
- Architecture: x86_64
- Distribution: Linux
- Version: Up to you (16.04 or 14.04)
- Installer Type: SELECT deb (local).
After that, run the instructions:
sudo dpkg -i cuda-repo-ubuntu1604-8-0-local_8.0.44-1_amd64.deb
sudo apt-get update
sudo apt-get install cuda
sudo reboot

# Execute in console, or (add in ~/.bash_profile then run "source ~/.bash_profile"), FOR nvcc:.
export PATH=/usr/local/cuda-8.0/bin:$PATH
export LD_LIBRARY_PATH=/usr/local/cuda-8.0/lib64:$LD_LIBRARY_PATH
where you change the deb filename to yours. For the installation of CuDNN (not required but speeds up the training), I advice you to check my page, section CuDNN installation Configuration of a GPU for Deep Learning. I did it with an old GTX 460 but it does not matter for CuDNN.
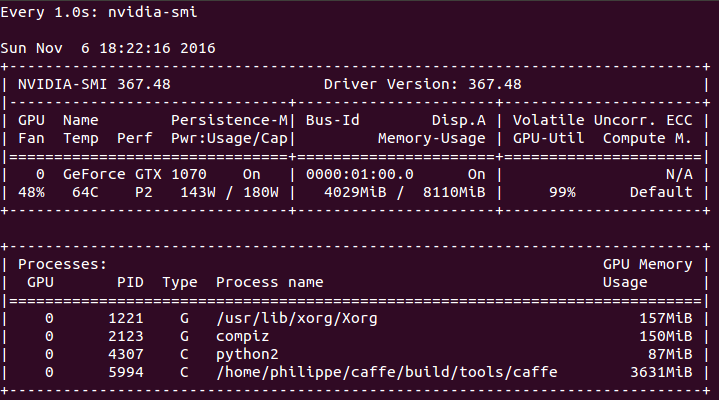
You will see something like this when it’s properly configured:
Conv Nets
For this fun experiment, we use the Google LeNet (2014) with 22 layers, described in this paper: https://arxiv.org/abs/1409.4842
The training is pretty long: 10 hours. The convergence is almost reached at 25 epochs. What we discover during the training is that the CPU is hardly used (100~150% on 400%) compared to the GPU (98~100% all the time). The process uses 4GB of memory on the GPU (50%).
We use the following parameters to train GoogleNet:
- Default values: As defined in the original paper
- Data Transformations: Subtract Mean of Image
- Batch Size: 32
- Crop Size: 224 (from 256x256 to 224x224, random crop)
- Optimizer: Stochastic Gradient Descent (SGD)
- Base Learning Rate: 0.01
- Learning Rate Decay Policy: Step Down (Step size 33%, Gamma 0.1)
Concerning the evolution of the accuracy and the loss, the plot shown below, illustrates it:
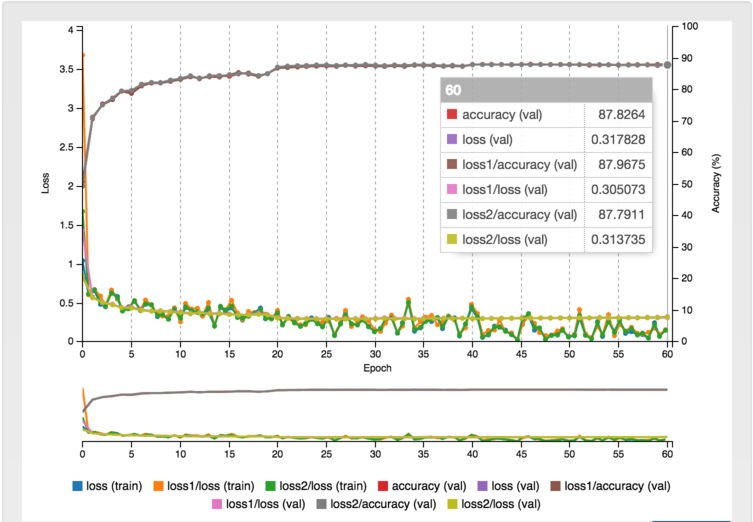
After 60 epochs and with the parameters mentioned above, we find an accuracy of 87.72% on the validation set on the LIKE-NOPE classification task. The model is not perfect by far however. I discuss about some ways of improvement in the conclusion.
Conclusion
First, thanks for reading! I hope you guys now have a clearer understanding of how to apply Deep Learning to solve real world (really?) problems! I had this idea of applying Deep Learning to Tinder a few months ago. The work you see here is only the premise of what could be a much bigger project. If you want to contribute, the source code is available here: https://github.com/philipperemy/Deep-Learning-Tinder. Don’t hesitate to start scraping Tinder and build your own dataset! It took me a week to build mine.
If you’d liked to learn more on the technical part, I strong advice you to check the Stanford University CS231 course.
The source code of the Auto Swiper (Tinder Bot) is available here. I invite you to star it, fork it and contribute!
Some ways of improvement are:
- Filter the pictures where there is no people (e.g. food picture) [EASY].
- Filter the pictures where there is more than one people [EASY].
- Generate a more robust dataset with data coming from Tinder only. Why? The data from Instagram is biased from time to time (lots of pictures at the beach…) [EASY BUT TIME CONSUMING].
- Applying some state-of-the-art NLP techniques on the descriptions would definitely be a very good way of improvement. One’s does not only swipe based on the pictures. Do they? [EASY TO DIFFICULT].
The filtering would require an additional model. You may find some very good ideas here: Awesome Deep Vision. The new generation would require people to classify the Tinder pictures yourself. It would become more subjective but much more precise and accurate. The NLP approach (text) could be reduced to a classification problem similar to Sentiment Analysis on Movie Reviews.